Showing posts with label Michael Miller. Show all posts

Monday, 18 August 2014

In support of Solids

I have teamed up with Robert Kaufmann' Kona Cotton and Love Patwork & Quilting to make a series of solids only quilts for the magazine. The first quilt that is truly a riot of colour and I promise you, should not be missed is made using all the new Kona colours plus many, many of the existing colours. It will feature in the November or December edition. So why am I telling you this ? Well, because Robert Kaufmann generously sent me two fat quarters bundles of the 33 new colours which means I can give one away. That I will do later in the week and I hope you stop by and participate.
But first I hope you enjoy a little trip down the solids only memory lane with me.


Over the past years I have not only appreciated solids but have worked often with just solids and now almost find myself preferring them to patterned fabric (there I said it).

And one of my all time favourite quilts is still the 'Single Girl' quilt made with Kona and Klona cottons. Having it on my sofa or bed or simply looking at it fills me with enormous pleasure and satisfaction and I am sure this will never change.


And I think the second favourite is my Comet quilt featuring Oakshott Cottons that really pack a punch.

Front

Back
But it wasn't always high impact colours that I went for. 'Tuscan Hils' uses masses of negative space in a very subtle way and incidentally was my first quilt on which I tried circular quilting and that has now become something of a trademark on my quilts.


I also used circular quilting with 'She loves the Blues' , a quilt commissioned by my brother for his girl friend. I really love this quilt with its floating squares.


A wall painting in a London restaurant served as inspiration to make the Sketch quilts. Sketch I was sewn from all my solids scraps and Sketch II with Michael Miller Cotton Couture and both make me smile a lot. Sketch II was also the first quilt that I made for LP&Q.

 
Sketch I
Sketch II

I must have been drunk to want to make 400 or so HSTs for 'Drunken Harlequin' but I was glad I did in the end. This quilt also uses the incredibly soft Michael Miller Cotton Couture solids.


And my latest edition to the ever growing solids series is the Gee's Bend inspired quilt 'Dreams of Summer' which was constructed without rotary cutter or ruler and felt quite liberating to make.


There is growing number of quilters such as Alissa Haight Carlton that now use solids as the main feature in their quilts and not just as a background colour. Solids only quilts have a distinct modern feel to it that is often combined with a graphic design element. I find it easy to use solids but know other quilters find it rather difficult due to their intensity. So I hope the giveaway that will be on my blog later in the week will inspire another quilter to become a convert for solids only quilts!

Sunday, 10 March 2013

Stash Note 78

How about a few basics ?
While trailing my favorite online stores a few weeks back I cam across the Michael Miller Stitch Circles collection at Fabricworm and instantly took to these prints in their wonderfully bright colours.


They remind a lot of Pear Bracelet by Lizzy House but these prints have a subtler feel to it. 


The yellow and orange are my favorites.


Tuesday, 25 September 2012

Drunken Harlequin

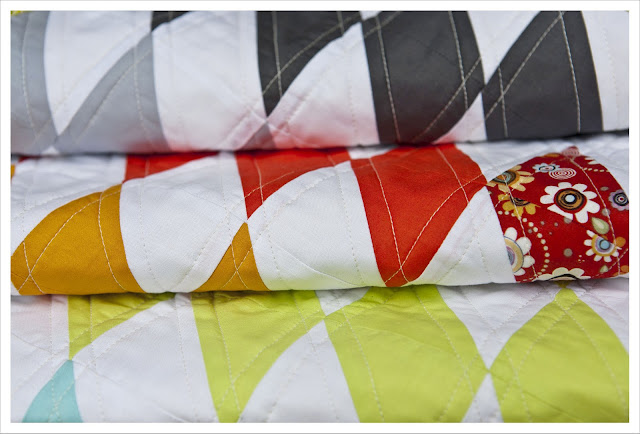
...is the new name I have given  the formerly known 'Summertime' quilt after several people pointed out that the pattern looked a bit like a harlequin pattern. But because it is a slightly wonky harlequin I am going to call it drunken harlequin !


So here it is and what a joy it was to make, although rather a lot of work. This quilt is 60" x 60" in size and has a staggering 400 HSTs which mean a lot cutting, pressing of open seams and squaring of blocks. It kept me busy on several early mornings before work and late nights too but it was well worth it.


For the back I used a well horded print from my stash from the 'Pretty Bird' collection by Pillow and Maxfield for Michael Miller. I have used this print for a quilt backing before in the red colour way which really added vavavoom to this quilt. The blue colourway worked perfectly with this quilt and I made up the remaining space with Kona in Peapot (one of the new colours) and Michael Miller couture in Malibu.


I quilted as per usual with Gueterman Sulky in 1082 along the HST stitch lines to make the pattern also visible through the quilting lines on the quilt back.


The binding was a difficult choice and I was for a while convinced it would be orange or red but then went with oval elements in  mustard/green to compliment to back and the front rather than to contrast.


I love the little splashes of patterned fabric I added in a few rows. I think it adds a bit of interest and lets the eye rest for a while on this rather lively quilt.


Drunken Harlequin is listed in my shop and and now I am of to the next quilting adventure. Stay tuned.

Tuesday, 18 September 2012

Summertime - progress -

It's not quite Summertime anymore and we are moving with great strides towards autumn. I started this quilt back in July and had every intention of finishing it quickly but then the craft fair lodged itself firmly in between and this gorgeous colorful work in progress had to be halted.


Last weekend then I took it out and I spend some quality time with it, finished piecing it on Saturday and started quilting on Sunday until a nasty cold got hold of me. Hot lemon with ginger is the order of the day since.


I can't tell you how much I enjoyed quilting again, I almost felt deprived of it, which of course is ridiculous but shows me really how much I love quilting and prefer it over making other crafty things.


I played around with the HSTs until I ended up with this pattern that sort of looks like wonky diamonds. I love the strict graphical nature of the pattern but have no idea if it actually has a name. Does anybody know this pattern, does it have a name or did I accidentally create something new ?


Tuesday, 31 July 2012

Summertime

Now we finally have some Summer I decided to play with summary colours and pulled out this lovely fabric bundle I featured in this stash note. I am most likely also inspired by the colours of the Olympics (no I don't mean the rings but all the great and colourful sports gear the athletes are wearing).

Any of you watching the Olympics ? I already went to the Beach Volley Ball at Horseguards Parade just outside Downing Street which was so much fun. I bet you the PM will have much interrupted sleep over the next weeks. 


This is the Quiltcon colour selection of the cotton couture collection from Michael Miller. I had a look at it the other day and then a feel and then thought that I needed to do something with this luxurious little pack.


So I started cutting and cutting and some more of the same....


.... and then sewing and soon had this wonderful colour bunch of HSTs that are glamoring to be made into something outrageously stunning ! (no pressure there....)


Sunday, 20 May 2012

Stash Note 56

Today's stash note is a lovely bunch of solids in the 'Quilt Con' colours from Michael Miller who recently have also started to produce solids like Free Spirit, Moda and Robert Kaufmann. Their collection is called 'Cotton Couture'.


I love solids and have a sizable stash of them. I think my favorite pure solids (i.e. not shot cottons) are those from Free Spirit as they have a wonderful sheen and a very soft and luxurious textures. And normally I would say this is followed closely by Kona solids but they might be pushed into third place now by 'Cotton Couture' as they too have a fantastic texture and are very light. Of course the biggest selection of colours is provided by Kona so they will always rank pretty high with me and will most often be the first choice simply because of their wider availability.


These were bought at FatQuater shop.

Friday, 11 November 2011

A finished Adventcalendar

 Last year Christmas my sister made her son an Advent calendar that was more an excuse for an Advent calendar than anything else. After I pointed this out to her she said "You are the crafty one in the family, so do something about it". She had me cornered there and then !
So I started out in May with the Making of a proper Advent calendar for my lovely 3 1/2  year old nephew Hauke. I started early knowing that I didn't want to have a mad rush in November. Mmmhh,.... it still was a bit of a rush in the end as I didn't do any stockings in the last couple of months but I still am glad that I at least made 1/3 of it earlier in the year.

These are quite a bit of work as I lined them all but they are also good fun and I am so so happy with the end results. Aren't they cute ? My sister asked me to make 4 stockings larger for each Advent Sunday and I think that works well in the overall look.


I used a fat quarter set of the 2011 Christmas collection by Michael Miller which was plenty. I also used it for the lining plus some leftovers of solid white I had lying around.


I posted already a tutorial (here) and templates earlier in the year in case you wish to make one for you family, friend or god children too.

Previous post can be found here and here.
 

Wednesday, 14 September 2011

Advents calendar stocking tutorial

I had a few people asking for a tutorial for my Advents calendar stockings . So I thought I oblige as we are nearing Christmas in alarming speed !

Few important points up front:
  • This is an excellent way to use leftovers from past Christmas crafting ventures, though I am using a fat quarter set of Michael Millers's 2011 Christmas collection (as I didn't have enough leftovers)
  • My stockings are lined but I don't think that this is strictly necessary - I just like them to look neat
  • The individual stockings aren't particularly large as they are just meant for small little somethings through the time of Advent but I have created two template sizes as I want to make 4 stockings that are larger for the Advent Sundays.
  • I choose to make each months 4 (or 8 every two month as I tend to forget !) but you can easily make a little production line and get it over and done with in one weekend

Material:
  • patterned cotton scraps from past x-mas or a fat eights or fat quarter set of a new collection (that is plenty and will give you enough to make other bits for the festive period)
  • leftover wadding
  • solid cotton scraps for lining (but you could also use patterned here if you prefer)
  • cotton thread for piecing
  • cotton thread for quilting
  • Template(s) can be downloaded here (The smaller one is to be used for 20 stockings and the larger one for 4 as I want to have a "larger" present for the Advent Sundays


Take a piece of fabric and fold it over from left to right as in the picture. This is important when you have a directional print as you don't want to end up having one half of the stocking upside down.


Download the stocking template, cut it out along the line and pin it onto the folded fabric. Then cut out the first stocking. 1/4 inch seam allowance is already included in the template !


You will end up with two stockings like this where the directional prints go into the same direction.


Then repeat the same process with the wadding and the lining (though you don't need to worry about print direction here). You should end up with 3 pair of booties like in the image below.


Next take your print booties and your wadding booties, pin them together and quilt in which ever pattern you prefer. I have chose to do diagonal lines that form a diamond pattern. I have not marked any lines here and just started to quilt from the top left corner to the bottom right corner and then set the quilt guide on my machine to a 3/4 inch distance and kept this for the subsequent lines. When have you done this with both stocking halfs it should look like this.


Now cut 2 strips of contrasting fabric that are each 4 x 2 inches.


Turn the strips right sides down and press the long edges a 1/4 inch toward the wrong side.You can either finger press this or use and iron - I am using an iron.


Then turn the strips around, place them on the stocking halfs a 1/4 inch below the top edge thereby taking care that the folded and pressed edges are turned in. Then top stitch along the top and bottom edge to secure the strip to the stocking.


It should look like this (sorry for the blurred photo):
The reason why I am doing these sort of fake cuffs is to minimize bulk. There are tutorials around for stockings with great cuffs but these are for large stocking and not for tiny ones likes these that are made into an Advent calendar.


Cut the excess fabric off to get a clean edge.

Take both booties, put the right sides together and stitch a 1/4 around the whole stocking with the exception of the opening at the top !


Now take both lining stocking halfs and sew them together in the same manner.


Almost there. Now we put the patterned stocking and lining stocking together.  Take the patterned stocking and turn the wadding side inside and the patterned side outside (the way it should look finished) and simply put the lining stocking with the wrong side outside (!) over it.


Stitch a scant 1/4 inch along the top leaving a large enough area open to turn the stocking around. Make sure you stitch over both side seams  (see black arrows in photo) which means you would leave the area between the side seam on one side of the stocking open to turn it around. The reason why I am asking to do this will become clear in a moment.


Turn the stocking inside out. You will end up with this. The stocking will be almost finished with the right side on the outside. Tuck the lining into the stocking make sure to push it right into the corners.
The only thing that is now left to do is close the opening you have used to turn the stocking around with a few hand sewn stitches. And it is much quicker to close this if you don't have to do it over the somewhat bulky side seams.


Done !


 And in no time you have a bunch of these:


And yes I am behind again. By the end of this month I will have to have produced 16 in total.....better get on with it then.

Please let me know if something is not clear, wrong or confusion. This my first big tutorial and I would be grateful if you could  give me honest feedback as only then I can learn from mistakes.

Sunday, 4 September 2011

Stash Note 28

I am not going Postal but Coastal for a change.
All Summer I have been waiting for this addition to my stash to arrive. I saw the preview of this collection on the Fat Quarterly blog one day and was immediately hooked.  The creative mind behind this fabric is Emily Herrick from  Crazy Old Ladies Quilts.


I have no idea why the blog is called like that but I can assure you there is absolutely nothing 'Old Lady' about this collections. It is colourful, fresh, innovative and vibrant. This isn't the entire set as I think Michael Miller have some trouble with the delivery but this will already give you a fair idea about the fabulousness of it all.


The bottle tops is my favourite print and I think this will make a wonderful quilt back,
don't you agree ?


All bought at Fabricworm.